Smart Security Keypad Support
Last Updated: December 12, 2025
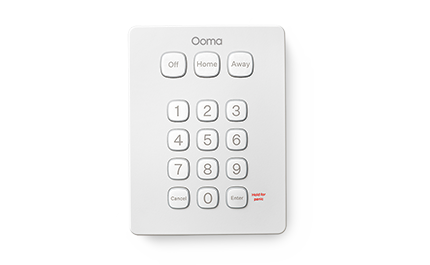 The Ooma Keypad acts as a physical control panel for your Ooma Smart Security system. Use the Keypad to check your current Smart Security mode, to switch between modes, and as a panic button (Pro Security customers).
Download Quick Start Guide (PDF)
—Ooma Keypad installation instructions
You will find the following items included with the Ooma Keypad:
- Ooma Keypad
- Adhesive pads
- Mounting screws and drywall anchors
- CR123A battery
- Quick Start Guide
The first time you set up the Keypad, you will need to pair it with your Telo Base Station. You can pair it by following these instructions:
- Bring the Keypad within ten feet of the Telo Base Station.
- Use the mobile app to press the **“Add Sensor”** button on the dashboard.
- Select **“Keypad”** as the type of sensor you would like to pair.
- Follow the on-screen instructions to complete the pairing process.
-
Looking at the back side of the Keypad, pull the clear battery tab to activate the device. It should automatically enter pairing mode, indicated by the LED on the front of the Keypad flashing green three times.
If the Keypad does not enter pairing mode automatically, remove the battery and wait 10 seconds. Re-insert the battery while simultaneously pressing and holding the **Enter** key. The sensor should enter pairing mode.
- Continue to follow the instructions in your mobile app to complete the pairing process.
Once the sensor is paired, you will need to decide where you would like to install it. The Keypad is not weatherproof, so it should be mounted indoors or in a dry location outdoors. The wireless signal between the Keypad and the Telo Base Station can be blocked by metals, so avoid mounting it on a metal surface such as a refrigerator or a water heater.
There are many different installation methods for the Ooma Keypad:
Adhesive tape installation
To install the Keypad on a wall with the included adhesive tape, start by wiping the surface with a damp cloth to clean it. Dry the surface, and then peel the adhesive tape. Press one side of the tape to the sensor, and then press the sensor against the wall and hold it in place for 30 seconds.
Screw and drywall anchor installation
To install the Keypad in drywall, start by using the back cover as a stencil to mark the drill holes. Drill the holes to fit either the drywall anchors. Push the drywall anchors into the holes and then screw the mounting plate into place. Reattach the sensor to the back cover.
Screw installation
To screw the sensor into a non-drywall surface, screw the mounting plate into the wall in the desired location. Reattach the sensor to the back cover.
—Choosing a PIN
The Ooma Keypad supports up to five PINs for family, friends, and guests. You will be prompted to choose at least one PIN during the setup process, but you can add more or update your existing codes using the Smart Security app.
PINs never expire, but they can be deleted if they are no longer relevant. If you are at the maximum number of PINs and you would like to add more, you will need to delete one code before you may add another. You can edit PINs at any time.
—Ooma Keypad options
You can use the Ooma Smart Security mobile app to configure your Keypad, including updating your PIN, and more.
You can learn more about the mobile app by visiting our FAQ.
The mobile app can be used to update the following options that are related to your Keypad:
- **Add and remove PINs**: You can have up to five separate PINs for your family and friends.
- **Set up emergency contacts**: Emergency contacts will be called in order when an alarm is triggered. Make sure that your emergency contacts know your security system’s safe word.
- **Entry and exit timeout**: By default, the entry and exit times are set to 60 seconds.
Switching modes using the Keypad
You can use the Ooma Keypad to switch between Smart Security modes by following these instructions:
- Type in your PIN.
- Choose a new mode: Home, Away, or Off.
If your mode transition was successful, you’ll hear a ding and will see the LED light up green. If the transition wasn’t successful, you’ll hear three dings and see a red light. Try again, making sure that you’re using the correct PIN.
—What the Keypad’s lights and sounds mean
The Ooma Keypad has two hidden LEDs: a green LED and a red LED. It can also emit audible cues to communicate its status.
The Keypad can use its lights and sounds to help you achieve the following:
- **Pairing mode:** Follow the installation instructions to initiate pairing. The Keypad will give you the following information:
- You will hear **two short beeps** and the LED will **flash three times** when the Keypad enters pairing mode.
- You will hear **one long beep** when the Keypad finds a Telo Base Station.
- **Check current mode:** Press any number key to check your Smart Security’s current mode.
- The button for the current mode will **light up**.
- **Switch modes:** Enter your PIN, followed by the mode you’d like to switch to.
- You will hear a **long beep** and see a **solid green** LED when your PIN is valid.
- You will hear **rapid, short beeps** and see a **flashing red** LED if the PIN is invalid.
- You may hear **periodic beeps** if the new mode has an exit delay.
- You will see the new mode’s button **blinking** while you are switching modes. It will show a **solid light** when the mode has switched.
- **Firmware update:** The Keypad will automatically download new firmware updates as they are available.
- While firmware updates are downloading, you will see **two red blinks and then a pause** repeating continuously.
Triggering an alarm with the Ooma Keypad
If you are a Professional Monitoring user and you need to trigger an alarm or panic signal to the monitoring station, you can press and hold the **Enter** button on the Keypad for three seconds.
When the Professional Monitoring operator calls, you can discreetly signal your distress by giving the wrong safe word. This will let the operator know that you are under duress. They will dispatch emergency responders accordingly.